Reviving the EXPLOR programming language
A writeup on reviving the EXPLOR programming language for fun and exploration
A couple of months back I saw some articles describing how the found some old graphics programming languages and made a interpreter/compiler for them and one of the languages that i saw mentioned was EXPLOR made by Ken Knowlton . So what one curious individual does, well research and implements it.
EXPLOR stands for EXplicit Patterns, Local Operations and Randomness.
The first problem was understanding how the language works, so we can construct a grammar and most importantly how the execution should progress. Information is pretty scarce, just scanned pages from the original publications that contain a couple of examples (UAIDE: Proceedings of the 9th Annual Meeting). Another example was a report from a course that Ken taught called (Report on the use of Fortran-coded EXPLOR for the teaching of computer graphics and computer art ).
The core concept of the language is for producing 2D stills and animations for artistic or for simulating two-dimentional processes. One of the examples that can be noted here is simulating snowflake crystallization.
Each program operates on an array comprised of values that can be any of [0..9,A-Z] (36 total options). Then that program essentially describes how those values can be translated to a black and white image, essentially its like a function that translates [0..9,A-Z] → True/False.
What it looks like
Before we start explaining how the language works is important to show how a full program written in it looks like.This should be quite normal for all introductions to a language because it gives more context and acts as a guide of what we are to expect from it.
This code is taken from the original article about the language and i found it to be the most simple one to understand and build upon. I would call it BTL Example.
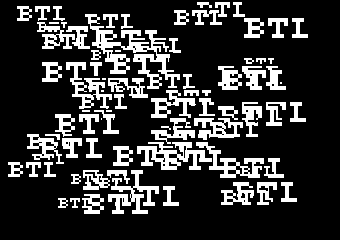
This is the resulting image after running the code:
 Example of the BTL Program
To explain a bit of whats going on, first off we create a pattern that we want to apply to our canvas, then we pick random location and print it repeating this around 50 times and then we output. At the end of the article there is another interesting example of snowflake formation that was used in an animation ( also describe in the original paper )
Program Instructions
From now on we go through all the instructions the language supports and explain the syntax and what they are used for. With one exceptions all instructions have this form:
- Label → Name that we can use to refer to the instruction
- Op → Name of the Instruction to execute
- Prob → Probabilistic indicator, used to determine if the instruction should be executed
- Arguments → The arguments for the instruction
- Goto → Optional glow control _goto_ statement that specifies where we should continue the execution
Label is just a short string so we can reference a specific line of code. Usually used for flow control with Goto . Another use is to name patterns those will be described later on.
Op is the instruction that can be any of the following [MODE, WBT, CAMERA, XL, AXL, PXL, BXL, BAXL, BPXL, SVP, PAT, DO, GOTO, TEST, CHV, CHP, XLI]. Those range from general setup instructions to flow control and transformation.
Prob is the probabilistic indicator enclosed in brackets containing only two integers ( n, p ) and a placeholder X. The number n specifies that every nth time we are at this instruction we should test 1/p as a probability to see whether we execute it or not. To better understand this concept we should illustrate it with some examples after this section.
Arguments are instruction specific that can be integers or a string, where the string acts like a variable name. Since we don't have any way to create variable, when we encounter a variable we assume its assigned a value of Every other time execute this with a probability 1. The Goto statement is optional and it should be a label of a existing instruction, we continue execution from the labeled instruction just like any goto implementation in existing programming languages.
Probabilities
As we described so far the Probablistic parameter of each instruction consists of two integers n and p enclosed in brackets with an option of a placeholder value X for more flexibility. Here are some examples that give some general understanding of how everything works.
Instructions
MODE
This instruction changes how the program is executed, arguments are a list containing any or all of the three options WRP/PLN , TST/RUN, SQR/HEX. WRP means that all the transformations wrap around (like a toroid ) and PLN mean they act in a planar mode. The second type of option TST means we run in test mode that means a restricted size (135x55) while RUN is the normal resolution of 320x240. SQR/HEX set what kinds of directions are accepted, in SQR (square) we have A( above ), B ( below ), R(right), L(left), N(north), E(east), S( south ), W ( west ) and HEX has all the directions except A and B.
CAMERA
Computes the array, meaning it maps it to the B/W domain and outputs the values. My current implementation stores the values into an array that later can be save into a file or output any way the user wants to.
Example:
CAMERA (1,2) 1this has a 50/50 chance to output an image
WBT
Contains a list with 3 entries, corresponding to what elements should be white,black,twinkling. Twinkling means that the pixel has a 50/50 chance to be black or white.
Example:
WBT (1,1)(01234,56789,ABCXYZ)meaning 01234 are white, 56789 are black and ABCXYZ are twinkling.
Next couple of functions contain a parameter called xlit that describes a transliteration transformation and pxlit that describes a probablistic transliteration transform, dir will represent a single parameter thats one of the directions and dirs - multiple directions
Before we start describing instructions for modifying the array lets put on some notation to have a clearer descriptions of the instructions.
xlit (transliteration) is a translation scheme that transforms the characters from the program array. There are four different ways that you can define it
A sequence of 36 characters that map the [0..9,A..Z] to another sequence of those characters
Example:
(1234567890BCDEFGHIJKIMNOPRSTUVWXYZ)this will map each character to the next one, so all 0s will become 1s all 1s will become 2s etc.
A sequence of less than 36 characters, that will replace only those defined and keep the values of the others
Example:
(ABCD)will replace 0s with As … 4s with Ds and every other char will remain the same.
A sequence ending in "…" , replaces the characters in order but the last one in the sequence will be applied to the remaining characters
Example:
(0123A…)will replace every character from [4..Z] with A.
A list of sequences ( at least two ) specifying a tuple of values that have to be exchanged
Example:
(AB,CD,02)will replace As with Bs , Cs with Ds and 0s with 2s.
Instruction for changing the array
XL
This is the most basic transformation instruction, it requires a integer q that represent the probability for the transformation described in xlit to occur. So every transformation has a 1/q chance to be preformed.
Example:
XL (2,1)3(56,78)every other time we run this instruction (because n=2), we have a 1/3 chance to change all 5s to 6s and all 7s to 8s
AXL
To add more versatility to the transformations this instruction lets us describe a neighborhood that should match for the transformation to occur and then we also test the probability q of the transformation.So for every pixel we check the neighbourhood and if it matches the amount described by NUMS we try to do the replacement.
Example:
AXL (1,1)234,RLWE,ABCD,5(XXX)Every time we run this instruction, for every value that has exactly 2,3 or 4 neighbors to the Right, Left, West, East are A,B,C or D then ~1/5th of the values 0,1,2 will be replaced by X
PXL
Similar to the AXL instruction but more controlled, with this instruction we can inspect the neighborhood in a single direction dir , but check different extent and value to replace. The argument pxlit is a list of triplets like 13B meaning that every value 1 with 3s in the direction dir will be replaced by B
Example:
PXL (1,1)R,1(12A,13B)For every pixel, we replace 1s with 2s to the right of them with As and 1s with 3s to the right of them with B, and this applies every time because our probability is 1.
Augmented pattern driven versions of the above instructions
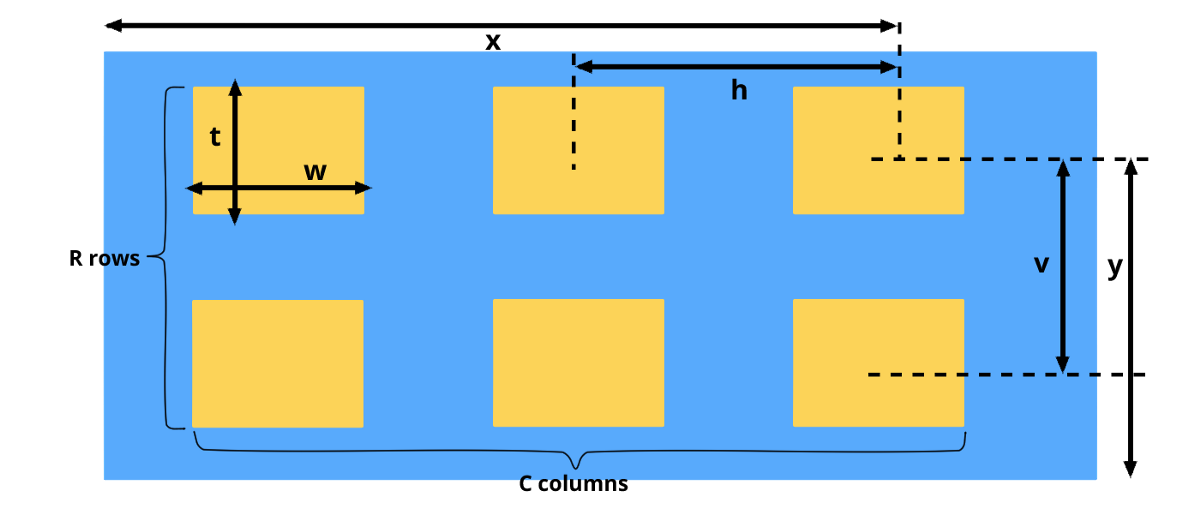
There are 3 more instructions complementing XL,AXL and PXL called BXL,BAXL,BPXL that add an additional argument specifying where they should be applied. That argument describes a rectangular pattern of boxes that span over our image array. The rectangular pattern is defined by 8 parameters x, y, w, t, h, v, c, r.
 Rows and Columns Layout
- x, y → coordinates of the center of the top right box
- w, t → how wide and how tall each box is
- h, v → center to center horizontal and vertical spacing
- c, r → number of columns and rows
There are two ways to define the rectangular pattern:
- pat(x,y,w,t,h,v,c,r) this uses a named pattern pat to pick what box should be traversed
- q(x,y,w,t,h,v,c,r) where q is probability of the box being traversed or not
Boxes can overlap, meaning some values will me translated multiple times and boxes will wrap around if we are in the WRP mode.
Defining Named patterns
After we mentioned named patterns its time we show how they are defined. The instruction for defining pattern deviates from the overall concept that each instruction has a probability and because of that they are usually placed at the top of the program. Each instruction PAT for defining patterns should have a label so we can refer to it otherwise it will serve no purpose.
 Named Pattern Definition
A pattern row is defined by a single 12 digit octal number meaning every digit is 3 bits, resulting in 36 values. If we have larger than 12 digits in a definition they carry over to the next row. Subsequent PAT instructions get added to the last named pattern so we don't have to repeat the label for every row ( you can see that in the example above ). One thing to note here is that we keep leading zeroes when converting to binary. But why only static patterns ?
Introducing the SVP instruction, a way to grab a portion of the image array and convert it to a named pattern. This instruction does now wrap and its converted to black and white values according to the current WBT settings.
Starting from the point (x, y) in the image array we select a rectangle with the defined width and height and give it a name. Here goto is separated with a comma because we cant know where height ends and the goto label begins.
Flow Control
Here we have some exceptions on how goto is handled, for IF and GOTO it is mandatory to specify it. The instructions for GOTO and IF are just transfer of control where IF is conditional and its argument pred is one of the following operators GT ( greater than ) , EQ ( equal ) and LT ( less than ). Parameters for the IF instruction can be a variable or just a fixed number.
The instruction DO acts kind of like a coroutine, so it executes the instruction named in the parameters and usually terminates with a special GOTO (1,1)DONE that is intended to return the control back to its original execution point.
Example:
IF (1,1)(SIZE,GT,17)ITERwill test if theSIZEvariable is greater than 17 and go to the instruction with labelITER, otherwise it just continues to the next instruction in the program.
The meta part of the language
Instruction modification
If all the the concepts so far didn't introduce enough randomness and variety, you have 3 more instructions for giving your program another layer of control.
CHV is a shorthand for CHange Value, but with a twist. The parameter param denotes the variable name we want to modify, and operation cant be any of the following [SET,ADD,SUB,MPY,DIV] corresponding to [=,+,-,*,/]. But wait there are two values val1 and val2 which one are we going to use ? Well val2 is optional, but has to be specified ( altho redundant ) if we want to use the goto statement. If we have no val2, we just use val1 to compute the new value otherwise we pick a random number in the range [val1,val2] that we use for the computation. Because it might not be really clear lets show a couple of examples.
Example:
CHV (1,1)SIZE,ADD,5,15this will be interpreted as something likeSIZE += rand(5,15), but if we hadCHV (1,1)SIZE,ADD,5it would have beenSIZE += 5
The next instruction CHP stands for CHange Pattern.
Its only used to replace what named pattern a BXL,BAXL or BPXL instruction uses, so something like CHP (1,1)LINE9,PAT3 will change the named pattern used in the instruction with label LINE9 with PAT3. Really specific to the aforementioned instructions but useful.
And now the last instruction of the language but maybe the most powerful one is for modifying already defined instructions using the same techniques that we use to modify the image array.
XLI needs a label of a already defined instruction, a parameter called part that specifies what argument we want to modify and a standard transliteration with a probability q(xlit). part can be any of the following values:
- NUMS → the numbers argument of a AXL or BAXL
- DIRS,DIR → the direction(s) of AXL,BAXL,PXL or BPXL
- CHST →the characters in AXL or BAXL
- XLIT → the transliteration (xlit) of XL,AXL,BXL or BAXL
- WBTS → the character strings in a WBT instruction
- TPLS →the translation triples of PXL or BPXL
Example:
XLI (1,1)LINE5,DIRS,1(NR,RE)→ replace the directions of the instruction at the label LINE5 where all North becomes Right and Right becomes East
Snowflake Example
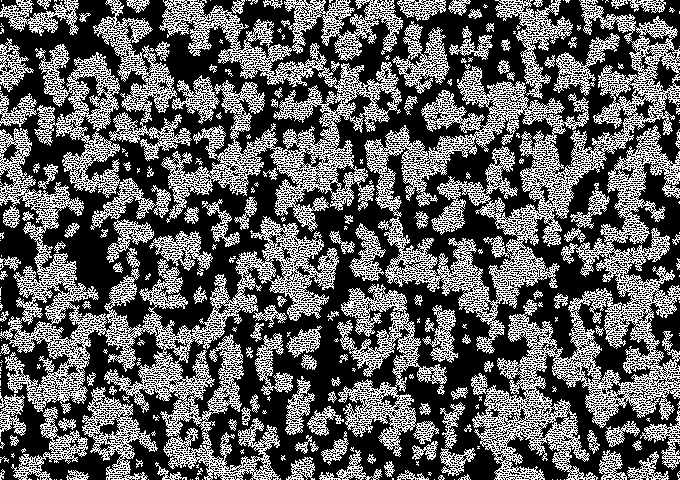
This example shows how powerful a language like this might be, such a small amount of code produces an image representing how a snowflake is formed without classes, shaders or complex structures. Everything is powered by randomness and manipulating of a simple set of values
    MODE (1,1)(WRP,RUN,HEX)
    WBT (1,1)(ABCD,0123,WXYZ)
    XL (1,1)1(0...)
XL1 XL (X,2,1)2000(0B,CC)
    AXL (X,2,1)1,NEWSRL,B,1(A...)
AX1 AXL (X,2,1)1,NEWSRL,A,2(0B,CC)
    XL (1,1)1(BA,CC)
 X1 XLI (1,X,3)AX1,NUMS,1(12,21)X1
    GOTO (X,30,1)XL1
    CAMERA (1,1)1
 Snowflake formation
Implementation
My implementation uses a custom parsing library, but the core of the execution of the language is separate from that so anyone can interface with it. The purpose was to make it really easy for someone to use a parser generator and their own output logic to create images. The project is implemented in C++ and uses type dispatch to execute commands and the random number generator that uniformly distributed.
One interesting usage would be to output the images to pipe and push them to ffmpeg to create animations. There is a posibility for some performance improvements, but i didnt want to get too invested in the project.